
在智能科技的风潮中,通过Zigbee MQTT技术,你可以将小米蓝牙插座和支持Zigbee的设备变得更加智能化。以下是一步步的指南,教你如何完成这个令人兴奋的DIY智能家居项目。
使用ZigbeeMQTT轻松操控小米蓝牙插座概述

硬件准备:
首先,确保你拥有以下硬件设备:
- 小米蓝牙插座(型号:Xiao Mi Zigbee ZNCZ02LM)或其他支持Zigbee的插座或设备。
- Zigbee设备(型号:CC2531设备)。
可以参考以下链接获取更多信息:
- Zigbee2MQTT项目主页:https://github.com/Koenkk/zigbee2mqtt
- Zigbee2MQTT官方文档:https://www.zigbee2mqtt.io/
CC2531设备识别并安装pyCCSniffer:
- 插入CC2531设备,并在终端中输入以下命令查看设备是否被识别:
lsusb - 使用pyCCSniffer工具进行数据嗅探,确保CC2531设备被正确识别。你可以在https://github.com/andrewdodd/pyCCSniffer.git获取该工具。
查看usb设备, 插入CC2531设备后
lsusb
显示CC2531设备
Bus 001 Device 003: ID 0451:16ae Texas Instruments, Inc.

cd /opt

git clone https://github.com/andrewdodd/pyCCSniffer.git
cd pyCCSniffer
python pyCCSniffer.py
apt install python-pip
pip install future
pip install pyusb 安装失败,升级pip就成功了: Command "python setup.py egg_info" failed with error code 1 in /tmp/pip-build-4hIAE4/pyusb/
pip install libusb
pip install --upgrade pip
pip install pyusb

成功显示
python pyCCSniffer.py
CC2531 USB Dongle <Channel: 11>
-------------------------------
Commands:
c: Print current RF Channel
h,?: Print this message
[11,26]: Change RF channel
s: Start/stop the packet capture
d: Toggle frame dissector
a*: Set an annotation (write "a" to remove it)
p: Print all capture packets
q: Quit

python pyCCSniffer.py -L /root/zigbee.log -D INFO
输入s


没有这个目录
ls -l /dev/ttyACM0

ls -l /dev/bus/usb/001/003 拔掉之后就没有了
ls -l /dev/bus/usb/001/005

lsusb  换了一个CC2531设备后
Bus 001 Device 004: ID 0451:16a8 Texas Instruments, Inc.

就有这个目录了
ls -l /dev/ttyACM0

ls -l /dev/bus/usb/001/004
安装Zigbee2MQTT:
- 首先安装Node.js和相关依赖:
sudo curl -sL https://deb.nodesource.com/setup_14.x | sudo -E bash -,然后sudo apt-get install -y nodejs git make g++ gcc - 克隆Zigbee2MQTT项目到/opt目录:
sudo git clone https://github.com/Koenkk/zigbee2mqtt.git /opt/zigbee2mqtt - 进入项目目录:
cd /opt/zigbee2mqtt,然后安装依赖:npm ci - 配置Zigbee2MQTT:编辑配置文件
vim /opt/zigbee2mqtt/data/configuration.yaml,在advanced下添加network_key: GENERATE - 安装依赖并启动:
npm install,然后npm start
安装Zigbee2MQTT
sudo curl -sL https://deb.nodesource.com/setup_14.x | sudo -E bash -

sudo apt-get install -y nodejs git make g++ gcc

node --version
npm --version

sudo git clone https://github.com/Koenkk/zigbee2mqtt.git /opt/zigbee2mqtt

cd /opt/zigbee2mqtt
npm ci

vim /opt/zigbee2mqtt/data/configuration.yaml

advanced:
    network_key: GENERATE

npm install
启动
npm start


> zigbee2mqtt@1.21.1 start /opt/zigbee2mqtt
> node index.js

                Zigbee2MQTT requires node version ^10 || ^12 || ^14 || ^15 || ^16, you are running v8.10.0!

Zigbee2MQTT:info  2022-09-30 14:38:47: Logging to console and directory: '/opt/zigbee2mqtt/data/log/2021-09-30.14-38-45' filename: log.txt
Zigbee2MQTT:info  2022-09-30 14:38:47: Starting Zigbee2MQTT version 1.21.1 (commit #4a51e0c0)
Zigbee2MQTT:info  2022-09-30 14:38:47: Starting zigbee-herdsman (0.13.138)
Zigbee2MQTT:info  2022-09-30 14:38:51: zigbee-herdsman started (resumed)
Zigbee2MQTT:info  2022-09-30 14:38:51: Coordinator firmware version: '{"meta":{"maintrel":3,"majorrel":2,"minorrel":6,"product":0,"revision":20190608,"transportrev":2},"type":"zStack12"}'
Zigbee2MQTT:info  2022-09-30 14:38:51: Currently 0 devices are joined:
Zigbee2MQTT:warn  2022-09-30 14:38:51: `permit_join` set to  `true` in configuration.yaml.
Zigbee2MQTT:warn  2022-09-30 14:38:51: Allowing new devices to join.
Zigbee2MQTT:warn  2022-09-30 14:38:51: Set `permit_join` to `false` once you joined all devices.
Zigbee2MQTT:info  2022-09-30 14:38:51: Zigbee: allowing new devices to join.
Zigbee2MQTT:info  2022-09-30 14:38:51: Connecting to MQTT server at mqtt://localhost
Zigbee2MQTT:info  2022-09-30 14:38:52: Connected to MQTT server
Zigbee2MQTT:info  2022-09-30 14:38:52: MQTT publish: topic 'zigbee2mqtt/bridge/state', payload 'online'
成功连接小米插座:
插入CC2531设备并在终端中
- 使用MQTT工具连接服务,例如:mqtt://localhost。你可以使用MQTTX等工具监听相应的topic。
- 将小米插座按下按钮5秒左右,观察终端日志,确保设备成功加入。
Xiao Mi zigbee ZNCZ02LM 设备按下按钮5秒左右, 灯闪烁,日志打印: Device '0x00158d00012ccbc2' joined 成功加入

 Zigbee2MQTT:info  2022-09-30 14:39:29: Device '0x00158d00012ccbc2' joined
Zigbee2MQTT:info  2022-09-30 14:39:29: MQTT publish: topic 'zigbee2mqtt/bridge/event', payload '{"data":{"friendly_name":"0x00158d00012ccbc2","ieee_address":"0x00158d00012ccbc2"},"type":"device_joined"}'
Zigbee2MQTT:info  2022-09-30 14:39:29: Starting interview of '0x00158d00012ccbc2'
Zigbee2MQTT:info  2022-09-30 14:39:29: MQTT publish: topic 'zigbee2mqtt/bridge/event', payload '{"data":{"friendly_name":"0x00158d00012ccbc2","ieee_address":"0x00158d00012ccbc2","status":"started"},"type":"device_interview"}'
Zigbee2MQTT:info  2022-09-30 14:39:29: MQTT publish: topic 'zigbee2mqtt/bridge/event', payload '{"data":{"friendly_name":"0x00158d00012ccbc2","ieee_address":"0x00158d00012ccbc2"},"type":"device_announce"}'
Zigbee2MQTT:info  2022-09-30 14:39:30: MQTT publish: topic 'zigbee2mqtt/0x00158d00012ccbc2', payload '{"consumption":0,"energy":0,"linkquality":81,"power":0,"state":"ON","temperature":38}'
Zigbee2MQTT:info  2022-09-30 14:39:31: MQTT publish: topic 'zigbee2mqtt/0x00158d00012ccbc2', payload '{"consumption":0,"energy":0,"linkquality":84,"power":0,"state":"ON","temperature":38}'
Zigbee2MQTT:info  2022-09-30 14:39:32: Successfully interviewed '0x00158d00012ccbc2', device has successfully been paired
Zigbee2MQTT:info  2022-09-30 14:39:32: Device '0x00158d00012ccbc2' is supported, identified as: Xiaomi Mi power plug ZigBee (ZNCZ02LM)
Zigbee2MQTT:info  2022-09-30 14:39:32: MQTT publish: topic 'zigbee2mqtt/bridge/event', payload '{"data":{"definition":{"description":"Mi power plug ZigBee","exposes":[{"features":[{"access":7,"description":"On/off state of the switch","name":"state","property":"state","type":"binary","value_off":"OFF","value_on":"ON","value_toggle":"TOGGLE"}],"type":"switch"},{"access":5,"description":"Instantaneous measured power","name":"power","property":"power","type":"numeric","unit":"W"},{"access":1,"description":"Sum of consumed energy","name":"energy","property":"energy","type":"numeric","unit":"kWh"},{"access":1,"description":"Measured temperature value","name":"temperature","property":"temperature","type":"numeric","unit":"°C"},{"access":7,"description":"Enable/disable the power outage memory, this recovers the on/off mode after power failure","name":"power_outage_memory","property":"power_outage_memory","type":"binary","value_off":false,"value_on":true},{"access":1,"description":"Link quality (signal strength)","name":"linkquality","property":"linkquality","type":"numeric","unit":"lqi","value_max":255,"value_min":0}],"model":"ZNCZ02LM","supports_ota":true,"vendor":"Xiaomi"},"friendly_name":"0x00158d00012ccbc2","ieee_address":"0x00158d00012ccbc2","status":"successful","supported":true},"type":"device_interview"}'
- 通过MQTT工具发送指令,例如
zigbee2mqtt/0x00158d00012ccbc2/set,控制插座的开关状态,观察小米插座上的指示灯。
zigbee2mqtt/0x00158d00012ccbc2/set
{
  "state": "OFF"
}

{
  "state": "ON"
}

Zigbee2MQTT:info  2022-09-30 14:47:14: MQTT publish: topic 'zigbee2mqtt/0x00158d00012ccbc2', payload '{"consumption":0,"energy":0,"linkquality":81,"power":0,"state":"ON","temperature":38}'
Zigbee2MQTT:info  2022-09-30 14:47:24: MQTT publish: topic 'zigbee2mqtt/0x00158d00012ccbc2', payload '{"consumption":0,"energy":0,"linkquality":86,"power":0,"state":"OFF","temperature":38}'
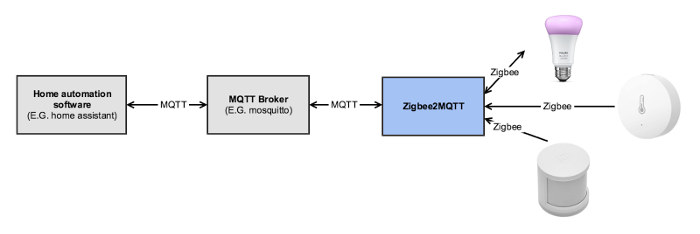
通过这个简单的DIY项目,你可以轻松地将小米插座变成一个智能设备,实现远程控制和自动化操作。希望这个指南对你的智能家居探索有所帮助!

发表回复
要发表评论,您必须先登录。